Rocket Project
Cover Letter
For the rocket project, we used a combination of physics and math content to design and build rockets. The objective of the rocket project was to apply knowledge from both math class and physics class to the engineering design process in order to design and build a successful rocket, which we then found the rocket launch calculations. In physics, we studied velocity, position, and acceleration. Position is the height of a projectile, the rocket in this case, at any given time. Velocity is the change in position at any given time, in this case the Acceleration is the rate of change in velocity of a projectile in motion. In math class, we studied graphing quadratic functions. A quadratic function is a function with variables that creates a two dimensional curve on a graph known as a parabola, with a positive or negative symmetrical curved line. A quadratic function models a projectile in motion because the projectile escalates then falls in response to gravity, creating an arc shape of motion.
We applied our knowledge content to the engineering design process, which includes seven steps to finding a solution, or in this case, to creating a successful rocket. Each step of the engineering design process applies directly to our design process. First, we identified the need and constraints, we were assigned to build a rocket, and were given constraints regarding the shape of the nose cone, the size of the bottle, and the necessary components. Second, we researched the problem, and found the most efficient shapes and most aerodynamic design. For the third step, we imagined and brainstormed different possible solutions, or in this case possible designs that would allow us to achieve our goal for a successful rocket. Step four was to plan for our promising solution, in this case choosing a design that best fits the achievement requirements. Step five was creating our prototype, where we combined all materials and built our rocket. Step six was testing our rocket, which meant launching it and observing the height and functionality, and step seven was improving our design, which meant refining our rocket based on observations from launching trials.
Calculations
Max Height
The first calculation that we found was the max height of our rocket. We created a triangle by finding the launching position of the rocket, the position of the angle measurer, and the theoretical height of the rocket. Since we are solving for max height, we didn’t know the number and exact position of max height, but we were able to create a triangle with a right angle. Creating this triangle then allowed us to use SOHCAHTOA to find max height, since we know the angle from horizontal from the angle measurer recorded when we launched the rocket. We also knew the distance from the launcher to the angle measurer, so we have one angle measurement and one side measurement. We determined the Hypotenuse, opposite, and adjacent sides, and used the equation tangent from SOH CAH TOA, which was tan(45)=opp200, which gave us an opposite value and max height of 204.75ft.
Time of Max Height
To find the time of our rocket’s max height, we had to count the frames in the video of our rocket’s launch. We knew that the Iphone that filmed our launch had 30 frames per second, so by counting the number of frames it took for our rocket to reach max height from the time it was launched, we were able to divide the number of frames by thirty to find the amount of seconds it took to reach max height. The rocket took 90 frames from launching time to time of max height, so we divided 90 frames by 30 frames to get 3 seconds as our time of max height. To find the total flight time, it was unnecessary to find the most accurate and precise time, so we were able to just count the seconds in the video from launch time to when the rocket hit the ground. We counted 10 seconds from launch to landing, so our total flight time is about 10 seconds.
Initial Velocity
To find the initial velocity, we used a specific formula, including different symbols representing different variables. The formula for initial velocity is h(t)=-12(g)(t2)+V0(t)+y0
We first listed all the variables that we already know. We know the time in seconds, (t) is 3, gravity in feet (g) is 32ft, and starting height (y0) is 1.5, since the rocket launcher was 1.5 ft off the ground.
Then, we used our numbers of max height, which is 204.75ft, and time of max height which is 3, to plug into the formula, 204.75=-12(32)(32)+V0(3)+1.5
We proceeded by simplifying and solving for the variable V0 which is the velocity. We found that our initial velocity is 115.75.
Theoretical Flight Time
To find the theoretical flight time, we used the same formula for finding the initial velocity, except we plugged in different variables and we solved for time,(variable t) instead of solving for velocity, (V0), which we can now plug in as 115.75. When simplified, this formula then took the form of h(t)=-16t2+115.75t+1.5. When this equation is applied to a graph, it creates a curve where the X axis represents the rocket’s launch time, and the y axis represents the rocket’s height.
We can now use this equation to create a quadratic formula, by identifying ax2, bx, and c.
a=-16
b=115.75
c =1.5
Once we have these variables, we were able to plug them into the quadratic formula. x=-115.7 +-115.752-4(-161.5)2(-16)
Once this equation is plugged into a graphing calculator, the two answers are x=.01, and x=7.25. The answer that represents the theoretical flight time will be the larger number because it’s further on the x axis, meaning that it’s the coordinate for the entire flight time, instead of just the starting flight time. The larger of these two answers is 7.25, and is therefore the theoretical flight time.
Blueprint
Reflection
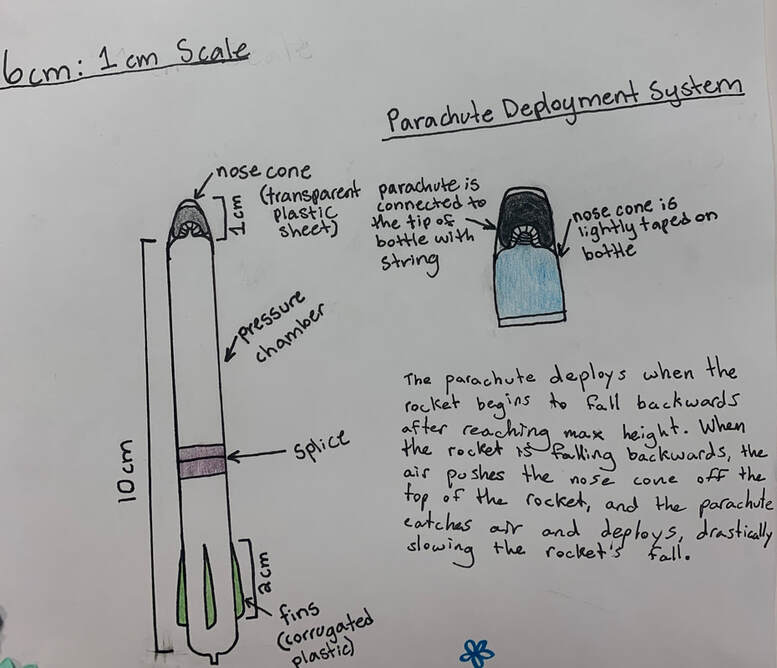
During the rocket project, I encountered and navigated several challenges with the splicing process, as well as the parachute deployment system. The most important step for our building process was splicing our rocket, where we cut the ends off two bottles and fit them together, then sealed the splice. This process was extremely precarious and delicate because one mistake would result in a potential leak in the pressure chamber, and the rocket would not hold pressure. We had to splice two times because the first spliced rocket did not hold enough pressure, and didn’t launch as high as it could have. The second splice held much better, but the parachute did not deploy. We struggled with finding a way for our parachute to deploy, because our nose cone design was too tightly fitted onto the rocket. When the nose cone was loose enough to allow for the parachute to deploy, the nose cone was unable to stay on the rocket, and would fall to the side. When the nose cone was secure and able to remain in position on the rocket, the parachute was packed too tight and the nose cone prevented the parachute from deploying.
I believe that my rocket design and product was successful in respect to the launch height and the efficiency of the design. SInce our design was on the simple side, we were able to easily recreate our rocket after destruction from test launches. We were able to make three rockets, in case any of them were unsuccessful, and we were able to do this because our design was simple and time efficient. Our simplicity did not affect the rocket’s success, we were still able to get a large maximum height. For next year sophomores, I would relay the idea of simplicity and efficient designs, which will allow for more time and energy to make more rockets if needed, and to have time for additional refinements.
During this project, the largest turning point for me was right after I completed our first rocket. My perspective changed based on the short time it took to build. I had more confidence in my ability to create a successful rocket, and I felt more comfortable with the time and resources we were given. I was able to quickly create two more rockets in time for the exhibition because I had the experience and confidence.
The biggest lesson that I learned during this project was that I have the ability to change my perspective and build up confidence in order to create a successful project. Prior to the rocket project, I was extremely nervous about my ability to build and engineer products, which prevented me from approaching this unit with confidence. Once I started gathering materials and building my rocket, I realized that I was just as capable as everyone else, despite my lack of experience with engineering. I think I can definitely apply this lesson to future projects, especially when I’m inexperienced and have low optimism in my abilities. I will approach new challenges with more confidence, and I now know that as long as I put energy and work hard at something, having a lack of experience does not mean I will be unable to be successful.
If I were to do this project again, I would maybe spend more time on my first initial design, and put more energy into one rocket instead of building three. If I had put my energy into one main rocket, I would likely have been able to come up with a better parachute deployment system, and I wouldn't have had to build so many backup rockets. I would also have had more confidence in my design, and I wouldn't need to build those extra rockets. Also, I would have done a bit more background research regarding the efficiency of nose cone shapes and fin shapes, in order to know which design would allow my rocket to be most aerodynamic. I would have watched more video tutorials of the rocket building process, and planned out each specific step for my own building process. This way, I would be able to have a solid plan and would have been more time efficient with prepared materials.
Link to Rocket Video
Tessellation Project
Haley Hurst
Tessellation Cover Letter
During the tessellation project unit, we learned about various geometric concepts. These include areas of polygons, the Pythagorean theorem, efficiency in shapes, tessellations, and patterns and tessellations demonstrated in nature. Some of the activities that we completed in this unit included constructions using a compass and straightedge, finding the areas of various polygons, and finding side lengths using the Pythagorean theorem.
A shape is efficient if it maximizes the volume, for three dimensional shapes, or maximizes the area, for two dimensional shapes, with the smallest perimeter. An example of this is building a horse stable, with hopes of providing the most amount of space within the stable, for the horses to move around, and a goal of using the smallest perimeter, or smallest length of the stable walls.
The most efficient shape to maximize area is a circle, and the most efficient three dimensional shape that maximizes volume is a spear. However, circles and spheres are only most efficient in terms of a single shape, and become inefficient in terms of tessellations, or when they are fitted together with other circles. Bees build honeycombs in order to maximize the amount of honey being stored, with the minimum amount of wax borders. The honeycombs form hexagons, because it’s the closest shape to a circle, with the ability to most efficiently tessellate, and fit together perfectly with no additional spaces or unnecessary borders. Therefore, the most efficient shape in terms of tessellation is a hexagon. In order to measure efficiency, we must measure the ratio of border to area or volume, and determine the efficiency based on the smallest perimeter with the largest area or volume.
In order to find the area of any n sided polygon, given the radius, (r), the first step is to divide the polygon into n equal isosceles triangles. Since the measures of each of the angles around the center will be equal, we can take 360/n to find each angle, in this case, called theta, Ø. Now we have an isosceles triangle, with a top angle of theta, which can be divided into two equal right triangles. In order to find the area of this smaller right triangle, we must use trigonometry.
So far, we know the measurements of one angle, and we know the length of the hypotenuse, r. To find the triangle’s height, or the length of side a, we must use cosine. So, cos Ø/2 is equal to a/r.
In order to find the opposite side length, o, we can use sine. The equation is
sin Ø/2=o/r. Now that we have the lengths of side a, and side o, we are able to find the area of the small right triangle, which would be a*o 2. If we double this value, we can find the area of each isosceles triangle within the polygon. The last step is to multiply this area by n, or number of sides of the polygon.
Project Reflection
I believe that this unit has helped me deepen my understanding of geometry, specifically in my understanding of volume and area concepts. For example, before this unit I was unable to understand how to find the area of any regular polygon, with more than four sides. It was extremely challenging for me at first, since I was not yet familiar with SohCahToah. Once I learned how to find the area of a triangle, with only one given side length, I was then able to complete the other steps in finding the area of the regular polygon.
Throughout this unit, I was taught the steps to finding the area of a polygon, and given lots of practice and demonstrations that helped me learn this new concept. I now know how to find the area, using sohcahtoah, and I can explain my process, and show my work using images and diagrams.
Additionally, this unit introduced the concept of efficiency in shapes, something that I completely new to. By learning about shapes and patterns in nature, I was able to expand my knowledge on this concept, and my understanding of the ratio of area to perimeter. Learning about tessellations also helped me define shape efficiency.
Cookies Final Project
Problem Statement
Baker Kate owns a french bakery on a busy pedestrian street where she sells her elegant cakes and french macaroon cookies. She has a limit on time and money for ingredients, as well as staff.
Kate needs to know the most profit she can make given the constraints, and what combination of the two will allow for the most profit.
Constraints:
Cost:
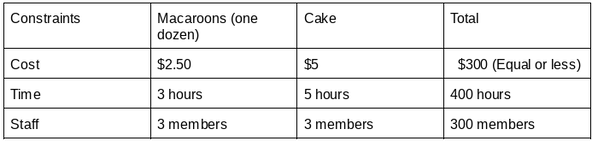
Kate has a total budget of $300
.one dozen of Macaroons cost $2.50 to make
. One cake costs $5 to make
Time:
Kate has a total of 400 hours to make her cakes and macaroons.
.Each dozen macaroons takes 3 hours to make
Each cake takes 5 hours.
Staff:
Kate has a total of 30 staff members.
Each cake requires 3 staff members, and each cake requires 3 staff members as well.
The staff members are only hired to help with one cake, or one dozen macaroons, so once the three people are finished with a cake or dozen macaroons, they are sent home, and baker Kate must use different staff.
Pricing:
Macaroons (one dozen):
Sell Price= 2.50+(3*2.50)
Sell Price= $10
Cake:
Sell Price= 5+(3*5)
Sell Price= $20
Problem Solution
Step 1: Organize given information in a table.
Baker Kate owns a french bakery on a busy pedestrian street where she sells her elegant cakes and french macaroon cookies. She has a limit on time and money for ingredients, as well as staff.
Kate needs to know the most profit she can make given the constraints, and what combination of the two will allow for the most profit.
Constraints:
Cost:
Kate has a total budget of $300
.one dozen of Macaroons cost $2.50 to make
. One cake costs $5 to make
Time:
Kate has a total of 400 hours to make her cakes and macaroons.
.Each dozen macaroons takes 3 hours to make
Each cake takes 5 hours.
Staff:
Kate has a total of 30 staff members.
Each cake requires 3 staff members, and each cake requires 3 staff members as well.
The staff members are only hired to help with one cake, or one dozen macaroons, so once the three people are finished with a cake or dozen macaroons, they are sent home, and baker Kate must use different staff.
Pricing:
Macaroons (one dozen):
Sell Price= 2.50+(3*2.50)
Sell Price= $10
Cake:
Sell Price= 5+(3*5)
Sell Price= $20
Problem Solution
Step 1: Organize given information in a table.
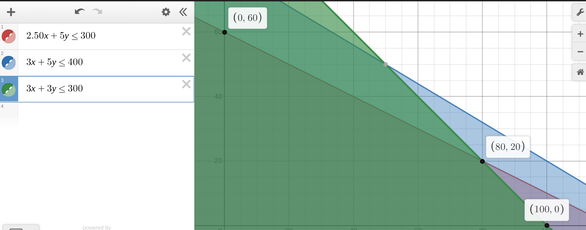
Step 2: Use the information to create Inequality equations.
.Cost: 2.50m+5c300
.Time: 3m+5c400
.Staff: 3m+3c300
Step 3: Graph the Feasible Region using the inequalities, and determine the best possible solutions.
m=x
c=y
.Cost: 2.50m+5c300
.Time: 3m+5c400
.Staff: 3m+3c300
Step 3: Graph the Feasible Region using the inequalities, and determine the best possible solutions.
m=x
c=y
Step 4: Find the profit for the best Solutions.
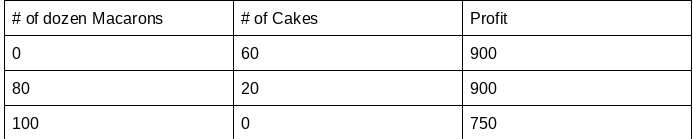
Macaroons (one dozen):
Sell Price= $10
10-2.50=7.50
Cake:
Sell Price= $20
20-5=
1 Cake has a Profit of $15
1 Dozen macaroons has a Profit of $7.50
Baker Kate should make 80 dozen macaroons and 20 cakes given her constraints to maximize her profit, and to give customers a choice between two different items.
Sell Price= $10
10-2.50=7.50
Cake:
Sell Price= $20
20-5=
1 Cake has a Profit of $15
1 Dozen macaroons has a Profit of $7.50
Baker Kate should make 80 dozen macaroons and 20 cakes given her constraints to maximize her profit, and to give customers a choice between two different items.
Cookies Project Reflection
Question:
In what ways has the cookies project helped you gain perspective on doing real world mathematics?
Response:
During the second part of the cookies unit, we used real life data and information to create our own math problem about baking products and business profit. This information was gathered from a coffee shop and provided costs of a variety of materials used in bakery items. I chose to create a problem of finding the most amount of profit when selling cakes and macaroons. I related this math problem to my life outside of school, because I am a baker who sells themed cakes and french macaroons. From completing this problem, I was able to find how much it costs to make one cake and one dozen macaroons. I can now use this information outside of school, and know which combination of cakes and macaroons will allow me to make the most profit. I was able to relate this problem to the real world, because I now use these mathematical solutions to figure out how much I spend on making cakes and macaroons, and how much I need to charge for each product. Because of this, I gained perspective on how mathematics is used in the real world, and how I can use it in my own life outside of math class.
